This is the second post in the series of understanding Databricks. In the previous post, we created Azure databricks account. Find it here.
Once you have created the resource, you can open it and will find yourself looking at a screen similar to below –

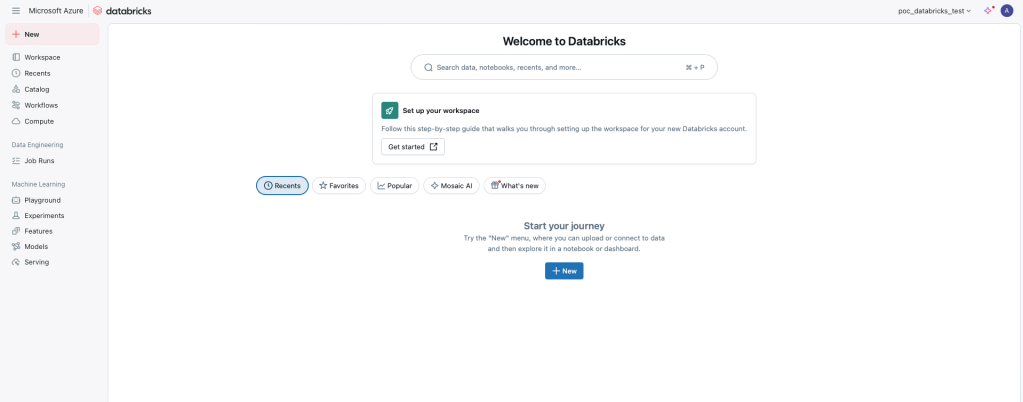
If Launch Workspace is not appearing on screen, it means that the deployment is in progress. It usually takes 10-15 minutes for the deployment to complete. So, now you have your workspace, launch the workspace, and you will find yourself looking at the below screen.
Let us begin by understanding the first two things that will definitely be required –
- workspace
- cluster
Creating a Cluster
Click on compute and on the top right you will find a create button. You can click on it and a dialog box will open in your screen. The screen looks like this.-

There are two types of clusters we can build. Refer to ReferencePost to get details on cluster, driver and worker nodes.
- Single Node Cluster – In this case, both the driver and worker nodes are on same virtual machine. What this means basically is that, considering node refers to a single virtual machine, in a single node cluster, there is a single virtual machine that is created, and both the tasks of driver and worker are done from that VM.
- Multi-Node Cluster – In this case, there is a single virtual machine dedicated for the driver and there can be multiple virtual machines for the worker nodes. This is good when you want to scale horizontally.
Creating a Single Node Cluster
- Access Mode – There are two options available in this –
- Single User – This option provides isolation to the users, which means that each user or notebook session gets its dedicated resources.
- No Isolation Shared – This cluster allows multiple users to share the same resources without isolation, suitable for collaborative environments where users need concurrent access to shared resources.
- Single User or Group Access – You can provide access to a single user or a group. So, if you have more than one people you want to give access to you, you can do that by creating a group and then giving it access.
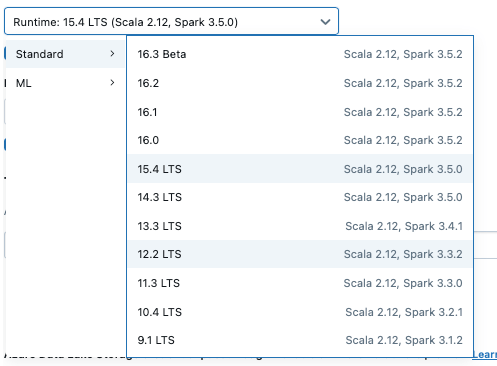
- Databricks runtime version – Databricks offers the following options for runtimes. Here, LTS means long term support. Databricks Runtime LTS versions are designed for organizations that priorities stability and extended support, even if it means they don’t get the newest features as quickly as regular releases. You can choose from the versions, in case the spark and scala version seem similar, there are additional other features that are added. But, what is runtime?
4. Photon Acceleration – Hmm, this is lot! For starters, it refers to Databricks’s native vectorized query engine, designed to accelerate Spark SQL workloads by leveraging C++ based execution instead of Spark’s traditional JVM based execution. It is ideal for improving performance in Spark SQL and Dataframe based workloads on Databricks. Refer to this to know when to use it.
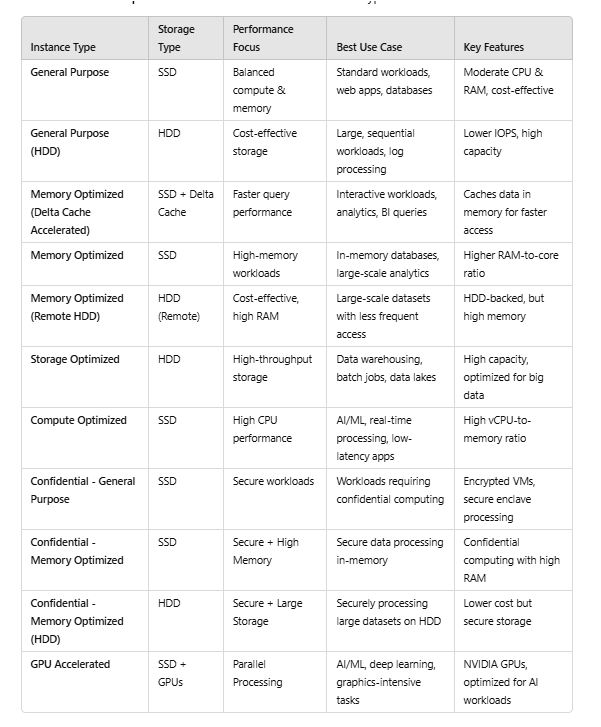
5. Node Type – Nodes are the virtual machines on which the driver and the worker nodes work. There are different types of node types –
- General Purpose
- General Purpose(HDD)
- Memory Optimised(Delta Cache Accelerated)
- Memory Optimised
- Memory Optimised(remote HDD)
- Storage Optimised
- Compute Optimized
- Confidential – General purpose
- Confidential – Memory optimized
- Confidential – Memory optimized
- GPU accelerated
Lets us look at the differences between these node types –
6. Terminate after – If you enable this, the compute or the cluster will be disabled after whatever minutes of inactivity you decide.
7. Tags – When we assign tags, they are useful when checking the cost or the usage in the cloud provider.
8. Advanced Options-
- Init Script – This is the initialization script, a shell script that runs during startup of each cluster node before the Apache Spark driver or executor JVM starts. Read more about this Here.
- Logging – Using this you can log all the activities of the cluster in a file. Read about it more Here
- Spark Config – We can set the spark configurations using this. These are used to fine tune our spark. Refer to this to get an idea of different spark configurations.
- Environment Variables – You can set the environment variables using this. These variables can override the existing spark environment variables, and are used in init script.
Creating a Multi Node Cluster
When creating a multi-node cluster you will get a screen like this –
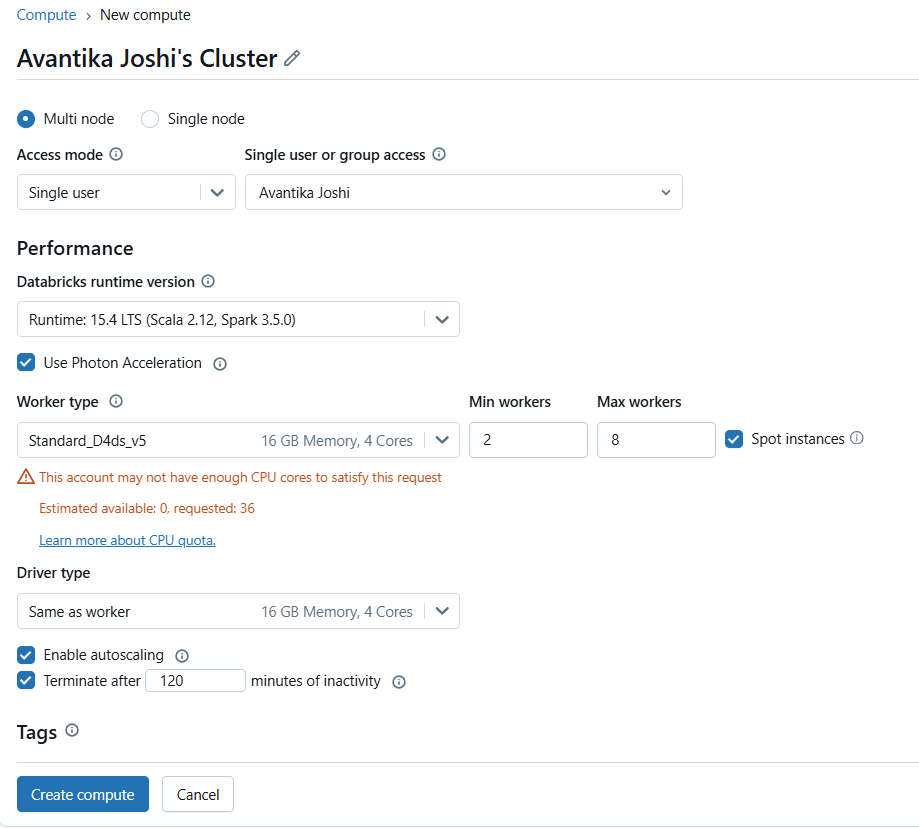
Other options remain similar to the single node cluster, however if you see, there are options available for worker type and driver type. You can choose different configurations for driver and worker. Let us understand the unique concepts in this –
- Enable autoscaling – When we decide the range of worker nodes, we would want that it should not always use the maximum worker nodes, neither should it use the minimum number of worker nodes. Depending on the workload it should decide the number of worker nodes it will require, this is what autoscaling helps with.
- Spot Instances – Use spot instances to save cost. If spot instances are evicted due to unavailability, on-demand instances will be deployed to replace evicted instances. Spot Instances leverage unused capacity from cloud providers(like AWS and Azure) and are offered at significantly lower prices that on-demand instances. You bid on the spare capacity, and if your bid meets or exceeds the spot market price, you win the instances. The cloud provider can terminate spot instances without notice, so they are best suited for fault-tolerant and flexible workloads. Spot instances should be used for worker nodes.
With this we have successfully, understood creation of clusters in azure data bricks. Let us know if you have any doubts.
Happy Learning 🙂

Leave a comment