Honestly, we have googled up a bit for this one, but mostly it is all that we experienced. Lets get started.
We hope you know that in ADF, it is integration runtime, linked services, data sets, pipelines and activities, in this order. So, you need an integration run time to create a linked service and linked service for dataset, dataset for a pipeline and a pipeline for activity. This post is about the last and obviously the most important piece of this entire data movement. Web activity can be used for lot of things, we shall be telling you about them as we experience them. This time we will be using it to send over mails and transfer files.
Sending Mails
If you are in IT, or into IT, sending mails is the most important task here. There is also a joke around that the ones who send best mail get paid the best. You could be working hours but if you cannot send a correct mail, it is not meant to be then. Jokes apart. Usually mails are sent for either informing that a particular load has happened, a particular table is refreshed, go check the data. They are also sent over as alarms. Like, hey this pipeline or this load that you were trying to do has not worked out. ADF in itself does not provide any way out to send a mail. All it does it allow you to have a http call. So using this web activity, we do an http call. This is then taken care of by a logic app.
So, if you are creating a web activity, you would see that you indeed are making an http call. Inside of the logic app, there is an activity which says, if an http call is received and then you use the send email activity.
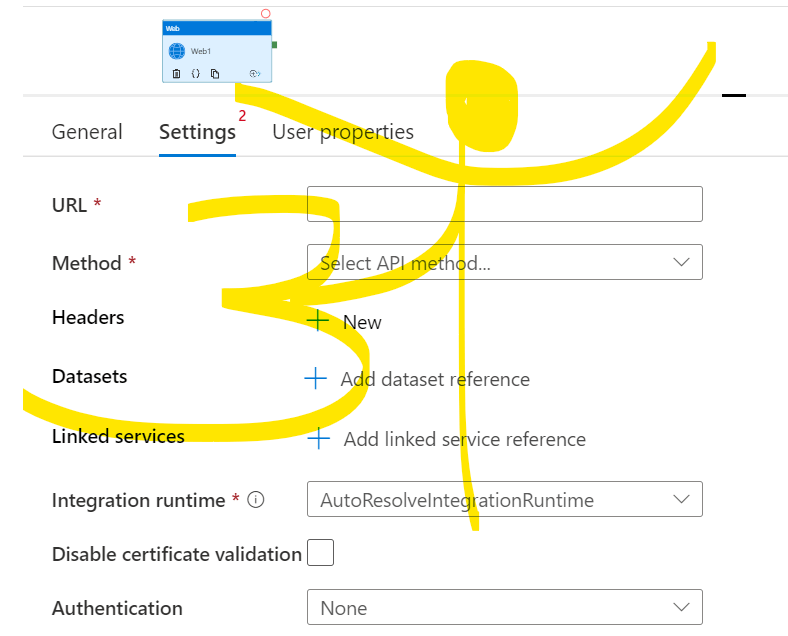
When setting this up, you need to ensure these things are done –
- url – this is the url of the logic app. So, when you create a logic app, the http activity automatically comes up in or may be you need to drag it out, but the http activity is the first task of the logic app. You would be getting a get started kind of menu which will help in creating that. Once the http activity is created in the logic app, it has to be pasted onto this url.
- method – There are five options that you will get for this. Post, Put, Get, Patch, Delete. You should use post when you are going to create something. If you are going to create a blob, you might well just use a post. Even when you are sending a mail, the method used is of POST. We use GET when we need to read some data. So, for example if you need to read a particular blob or well not blob, because there are connectors for that in here already. But, the ones for which the connector is only present via the logic app, and you need to read its content, you use GET. When we have to update we use PUT, when we need to delete we use DELETE. There is also one more which is PATCH. Although PATCH and PUT seem similar, because both of them are doing the work of updating, the difference lies in the amount that they are doing. So, if there is a full update that has to be done, we use PUT. When we we need to update just a part of it, we go ahead with PATCH.
- headers – headers are important. We will be updating this further. As and when we get a chance to explore on this. But, if you are using POST, which most likely we use, the headers need to be set to , name as Content-Type and value as application/json.
- datasets – more on this later. But, datasets allow you to pass a set of data that you can perform action on.
- linked services – more on this later. You can pass on a particular connection.
- Integration run time – This depends on what you are connecting to. as explained earlier, if you are going to pass a dataset, you need the linked service and the integration runtime associated with it.
- body – this is important. This is the content that you will be passing on to the logic app. For example –
{
“DataFactoryName”: “@{pipeline().DataFactory}”,
“EmailTo”: “@{item().reciever}”}
The body of your web activity could be this. You can have two parameters which you are passing to your logic app. The values of these you are getting from the pipeline. In the logic app, on the activity, get https, you need to write the json format similar to this. This is similar to how functions in our programming languages work.
{ “properties”: { ” DataFactoryName “: { “type”: “string” },
” EmailTo”: { “type”: “string” } }
So, your logic app should know the values that will be passed on from the web activity. Note that it is okay for you to have more parameters in the logic app than the datafactory. But, all the parameters that you are passing from datafactory should be present inside the logic app.
8. authentication – there are different options that you can choose from. In case, no authentication is required, which was our case when sending the mail, we made it None. Then we have the basic authentication, this would ask the user to type in their username and password to use it. In case of client certificate certification, you need to specify base64-encoded contents of a PFX file and the password. Last, we have our favorite, the managed identity. In this case, you need to pass the url of the resource. Managed Identity would already be enrolled for this.
Once your http activity is set up, in your logic app, you need the ‘send an email’ activity. In it, specify your body, your to, from and if there is an attachment. Usually, the values for to and from are parameterized.
We hope that this content was useful to you. We will be updating it for more details.
Happy Learning 🙂

Leave a comment