When working with SQL Server, it is lot more fun if you know how to use queries and make changes or retrieve data. Initally, let us learn the basic concepts related to it.
1. CREATING A TABLE THAT IS EXACTLY SAME AS SOMEOTHER TABLE
SELECT * INTO table1
FROM database .. table2
This query will fetch all the results from the table2 of database (name of the database) and insert it into table1. However, while copying although the entire data and the structure are copied but the constraints are not. Only the NOT NULL constraint gets copied from table2 to table1.
It is important for you to understand that the above query will create a permanent table. However, if you wish to create a temporary table, you need to provide the details in that order.
2. CREATING A PRIVATE TEMPORARY TABLE SIMILAR TO SOME OTHER TABLE
SELECT * INTO #table1
FROM database1.. table2
This query creates a temporary private table (i.e. the table will be visible only to the database in which it is created, however, since it is temporary, once the session is over, the table will no longer be available). The fact that it is a temporary private table is illustrated by a single # in front of the table name.
3. CREATING A GLOBAL TEMPORARY TABLE SIMILAR TO SOME OTHER TABLE
SELECT * ##table1
FROM database.. table2
This query creates a temporary global table (i.e. the table will be available outside the database also). However, since it is temporary, once the connection is lost the table is lost.
4. SP_HELP
Once you have created a table or any other object, it often so happens that you want to know the structure and the data available in it. For this purpose, SQL Server provides you with SP_HELP option that shows the data and the structure of the object you want to see. For example- SP_HELP table1 will tell you how the data is stored and what data is being stored.
5. DELETING A TABLE
When running a query, we don’t want errors to pop up. How is this thing helpful in deleting? Well, while trying to delete a table, SQL provides you with a feature that allows you to check if the table or for that matter any object is available or not. If the object is not available, it does not performs any operation. Else, it does as you say. Now, let us see, what happens –
IF OBJECT_ID (‘tablename’) IS NOT NULL
THEN
DROP TABLE tablename;
The above query checks if the table exist or not. For that, it tries to find out its object_id. If the table is present, it surely will have any object_id else it will be NULL. What are we trying to do? We are checking if the table’s ID is not null. we will delete it else we already know it is not present.
UNDERSTANDING TOP
Let us assume that we have a table, marks table, that stores the marks of some say about 10 students.
Let the table be this –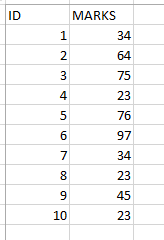
Now, I want to find the marks of the first four students of my table. Logically, by common sense, one will say, find the TOP 4. This is exactly what SQL Server also do.
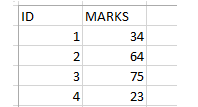
1. DIRECTLY SPECIFY THE NUMBER OF RECORDS SPECIFIED
SELECT TOP 4 *
FROM marks;
The above query will give the following output –
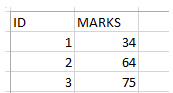
2. SPECIFY THE NUMBER OF RECORDS USING PERCENTAGE
Sometimes, rather most of the times, you don’t know exactly how much data is present. Just imagine, the table that has all the records of the facebook users. It will be in millions, who knows the exact number (more importantly, why remember). In such cases, I may want to find out a pattern and for that I need like 25% of the data. In SQL Server, you can provide the required number in percentage.
SELECT TOP 25 percent *
FROM marks;
The above query will give the following output –
3. FIND THE TOP 5
I know the example above are easy to understand, but most of the times this is not what we do. We don’t want the marks of first five students, we rather want the marks of students whose marks are among the highest or lowest. How do we do that? SIMPLE. You ORDER BY the data accordingly and then find out the TOP 5.
This is done as –
SELECT TOP 5 *
FROM marks
ORDER BY desc;
The above query will first sort the data in descending order of marks, so now the ones who have the highest marks are at the top most and the ones with less marks are below. Now, when you use TOP, you simply get the students with top marks.
The output of the above query is as –

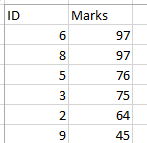
Now, what happens if the marks were repeating, like there were two students who got 97. In that case, you would have got the repeated values, rather than the ids of the people with top 5 marks,
Have a look –
Did you noticed that in this case the person with id 9 was not displayed.
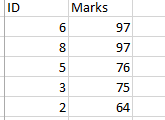
But, if you want to see the TOP 5 individuals even if the marks are repeated, you need to use TIES.
The query goes like this –
SELECT TOP 5 WITH TIES *
FROM marks
ORDER BY DESC;
In this case, the output will be like –
.
In this case, you can see all the people who are amongst the top 5 performers.
4. PROVIDE YOUR OWN INPUT
TOP allows you to enter your own input while selecting the data. This is done as –
1. HARD CODING
SELECT TOP (9/3) *
FROM marks;
2. TAKING INPUT
DECLARE @variableone INT
DECLARE @variabletwo INT
SET @variableone=9
SET @variableone=3
SELECT TOP (@variableone/@variabletwo) *
FROM marks;
NOTE – The star in all the above queries shows that you need to fetch all the columns from the table.
The variable names begin with @ and are given values with the help of SET or SELECT. You are declaring the variable using the DECLARE keyword.
_____________________________________________________________________________
Happy Learning 🙂

Leave a comment